One of an automated lighting programmer’s most important tasks is the creation of position palettes/presets. While some may see this as a mundane routine, I find it very exciting as I move the fixtures into positions. During this time, I get to see what can be created simply by focusing light into unique locations and configurations. Depending on your production and console, there are many tools and processes that can be used to aid in the creation of position palettes/presets.
Alignment
Before you begin creating any positions, it is important to align all your fixtures so that they are moving in the same direction when you turn the encoders. I like to have all my pan parameters move left and right from my perspective with the encoder and all tilt to move towards downstage with a “downward” or counter-clockwise turn of the tilt encoder.
While most fixtures have invert and swap functions for pan/tilt in their menus, it is always best to make these changes directly from the console. This way if a fixture is ever swapped out, the console “knows” what which fixtures and parameters should be inverted or swapped. Most consoles will allow you to invert the pan and tilt functions directly within the patch function. In many cases, the console is actually changing the DMX values sent, while other consoles offer the ability to simply invert the action of the console’s encoders. Either method is useful, but I find inverting the encoder the best option as it can be done at anytime without affecting anything that has already been programmed.
Defaults and Offsets
Another great process that I employ before creating any positions is to define new default positions for all fixtures. Typically your console will apply a default pan/tilt value that puts the fixture at its 50/50 or pointing straight down (when hanging). If you want to ensure your fixtures always move the same directions as they move across the stage, then it is important to avoid flips. The best way to do this is to assign a new default tilt position that has the fixtures pointing in the same basic location as most of your looks. I prefer to default them all pointing towards the downstage edge. Now when I grab any fixture, I can easily pan and tilt it to any location on stage, without worrying about being on the wrong side of the pan (resulting in a flip).
If you have fixtures mounted along a curved or circular truss, you will find that creating a linear look can be difficult, as each is angled slightly different from the others due to the curvature. This can be remedied with a default position or some consoles allow you to define pan and/or tilt offsets in the patch. With this feature, you can simply enter the percentage or degree that each fixture is different from the others and they will automatically align accordingly.
Focusing Rule #1
When it comes to actually moving lights around on the stage, there is a longstanding rule that has existed almost as long as moving lights themselves. If you are not already following this rule, then read carefully as it will certainly help you in your positioning. When moving an automated luminaire, it is best to always adjust tilt first. Just remember: Tilt First to ensure the best focusing possible. By tilting the fixture first, you will easily see where it is pointed and then can pan to the desired location. Panning first could result in the unit spinning in circles, or arcing to a position more upstage than desired. If you get lost in panning, then you are more likely to create accidental flipping of the fixtures as they move from one position to another during your show.
The Right Focus
When focusing lights on stage, you need to always keep in mind the height of the performers. For instance, if you simply aim at the microphone stand, then your singer will likely end up with a bright chest, but dim face. You actually need to aim a bit higher to light his face. I also prefer to focus with a narrow zoom and try to put the hotspot in the primary position for the desired focus. Then, when looks are made, the zoom can be adjusted as needed. When focusing backlight, you need to again remember to focus high and not just to the floor location.
If you can get a tech or a light walker to stand in the various places on stage, this will make your focusing much easier. Instead of actual people, you can use analogs such as balloons, towels on mic stands, cardboard signs, or even road cases to give you an object to aim your lights at during your focus.
When building aerial focuses, be sure to have the haze on so that you can properly see the beams. Take the time to ensure you are not blinding the audience (unless this is the intention), and also check that the beams are not going to burn anything. All too often I have seen programmers simply tilt lights up without seeing exactly where they are pointing. This can lead to dangerous situations, and it is the programmer’s job to ensure all positions are safe.
Cool Tools
Sometimes your front of house will not allow for a direct view of the stage, or perhaps your point of view is off center. In these cases, you will need to take additional action to guarantee your position creation goes well. There are several methods you can employ to assure you get the focuses correct. First, you could have someone else (the LD or a tech) spot you while you make adjustments. They can call out to you over a radio or cell phone to direct your movements of the fixtures.
Alternately, you could make use of a second console or console remote to move yourself to a better position. On many occasions, I have moved my backup console to a different position simply for focusing duties. I have also made use of my phone or tablet to take a handheld version of the console on a walkabout through the venue with me. I have even stood on stage with my remote focusing lights at myself!
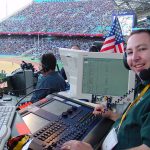
Third, let video be your friend. A simple camera wide shot from a center position can help you see how the focuses look. Furthermore, if there are other locations you cannot see, remote video can be a big help. Ask the video crew to leave a wide shot live for you during your focusing session. If you don’t have video on your show, then remember that video systems are rather easy to setup temporarily and can be viewed on a monitor or your phone/tablet.
Memory 9
Creating positions for a show and storing position palettes/presets is a normal task for any automated lighting programmer. Be sure to always store your focuses into palettes/presets for quick recall, and even more importantly, easy updating. I am old enough to remember a time before we had the concept of palettes/presets and, believe me, we don’t want to ever go back to not having them. Make use of the various tools discussed here to ensure your positions are created with ease and have fun being creative with your rig. There are always new positions and possibilities waiting to be discovered. And remember to always Tilt First!
Pictured: Jacky Cheung in Las Vegas. Video monitors set up to display stage lighting from different angles can give lighting programmers and operators a better look at focusing positions before — and during — the show. Photo by Don Earl