Nook had questions about disguise media server programming. Screens producer Loren Barton had answers.
Most media servers started out with the simple feature of being able to manipulate and playback video content, sending a signal to a projector or an LED wall. Most lighting designers can work out the basics of media playback, but nowadays, media servers have evolved to do so much more. Many of them can achieve the same results, though as programmer and screens producer Loren Barton is quick to point out, “The way to get there can be quite different.”
Barton works on many popular events as well as concert projects for large scale artists. Since he is constantly working with famed designers on groundbreaking projects, we thought it might be best to have him expand on all the things the disguise platform does well with a series of questions and answers.
PLSN: I understand that disguise’s OmniCal is a new software-on-hardware system, specific to disguise, that is a camera-based calibration system. But what does that mean, in layman’s terms?
To answer this, let’s dig into what we mean by “calibration” with a couple examples. When a projector is pointed at an object, there is no initial relationship between the server sending the image or video and the object in the real world. The simplest example of this is when you point a projector at a rectangular screen. The projector is outputting a rectangular image, but unless the projector is exactly centered on that screen, there will need to be some adjustments made to get the four corners of the projected image to line up with the four corners of the screen. For this, we would typically use a keystone layer in a conventional media server to manually adjust the X and Y of those four virtual corners until they lineup with the real world four corners of the screen. This is the most basic function of a calibration process: getting the image to look correct in reality, (even if it looks a little strange on the server output).
Now, taking this a step further, instead of a 2D plane (like a rectangular screen) we want to project, or “map” onto a more complex 3D object. This calibration process gets a little more involved, but the underlying principles are the same — we want to teach the software where known 3D points from the visualizer are in the physical world and link them together.
Most 3D servers have a way to achieve this. The main method within the disguise platform for this process is called QuickCal. This works by selecting points (corners and edges) on the virtual 3D mesh and then teaching the software where those points are in reality by moving the point left/right/up/down until it’s being projected onto the same physical place on the object. By repeating this process with more points, the software works out exactly where the projector is positioned in the real world and the image snaps into place, mapped onto the physical object. Of course, the 3D mesh and physical object are usually not 100 percent the same, so the final step is to usually go back and clean up the calibration by either adjusting the points or applying an overall warp on top of the calibration to fine-tune the results.
The QuickCal method assumes three things:
- You have a very accurate 3D mesh of the object
- You have clearly defined (and visible!) points on both the 3D mesh and the object to reference for lineup
- You have the time to repeat this process for every projector in your rig.
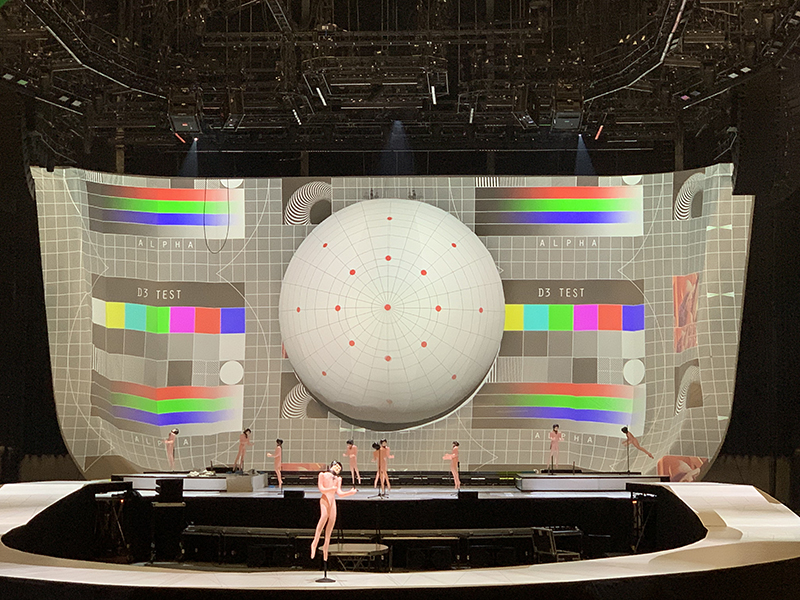
This is where OmniCal comes onto the scene. OmniCal offers two alternative sets of hardware to scan the physical environment: a wireless iPod Touch camera-based system and a wired Power-Over-Ethernet machine-vision camera-based system. These each have their strengths, and for our project with Ariana Grande’s Sweetener tour (March-Dec. 2019), we opted for the hard-wired solution.
Why is OmniCal different than more traditional calibration techniques?
The difference with OmniCal is that it works out a lot of the variables at once by using the cameras to capture images of many test patterns being projected on the objects by the actual projectors without the need for “beacons” or markers on the set. Since the physical relationship of the projectors to the objects to the cameras stays the same throughout the capture, a lot of data can be determined allowing the software to work out the geometry of the real world and create a virtual world from it. Instead of aligning individual points manually like QuickCal, OmniCal is actually scanning the real world and constructing a huge array of floating points in space appropriately called a “point cloud.” From this point cloud, a 3D mesh of what the cameras captured is created and used in the calibration process.
How do you go about placing the cameras in the first place to incorporate this OmniCal operation? As in are there certain parameters you need to work with, or do you just surround an object with as many cameras as you can and allow the computer program to do its thing?
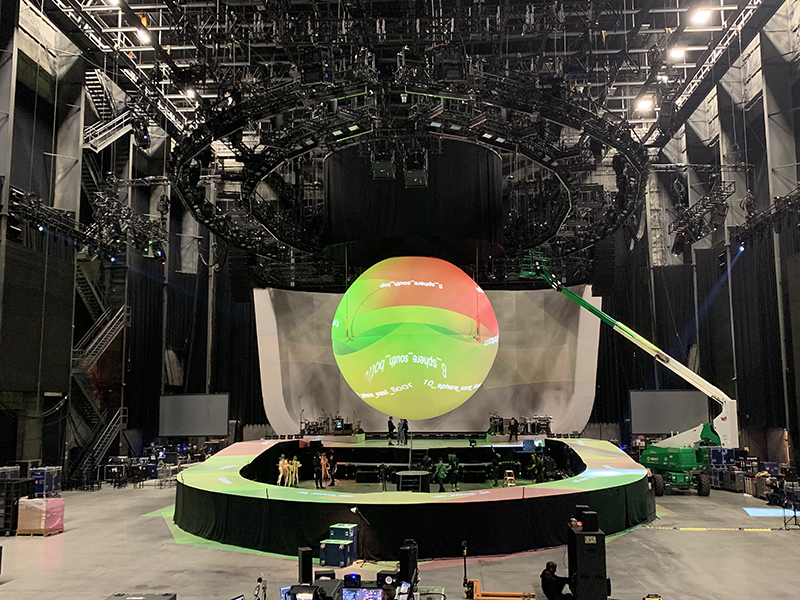
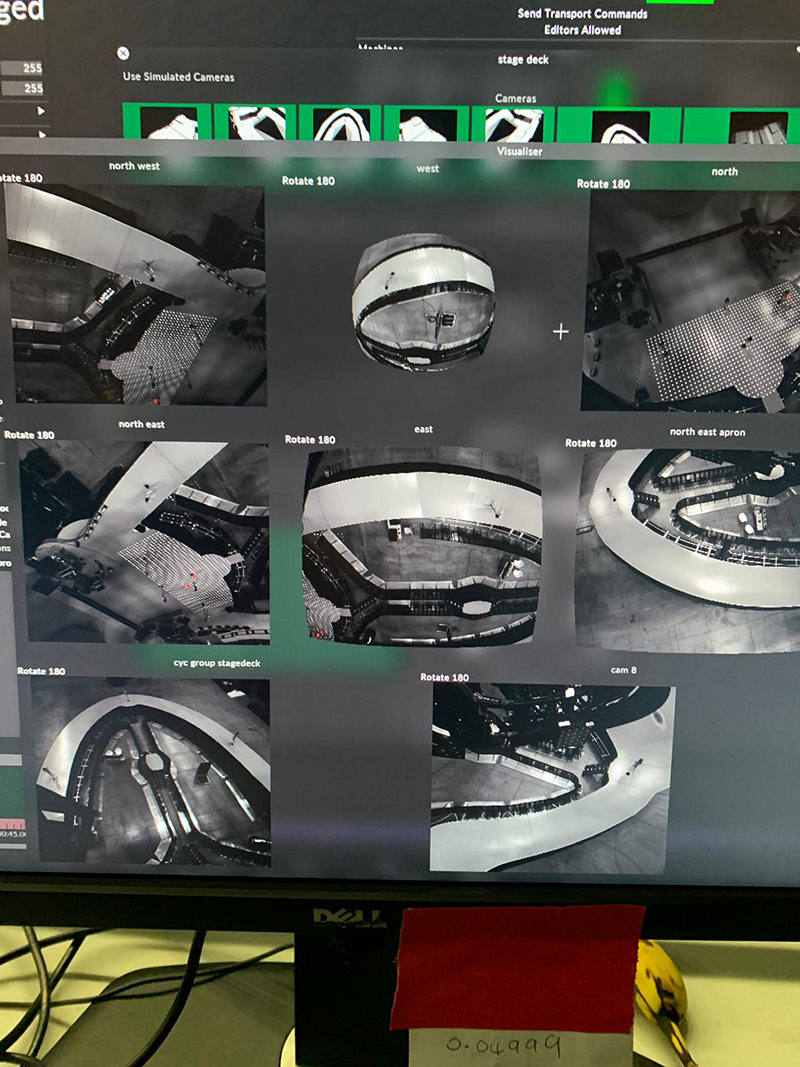
Just as you might plan your projection system in the disguise visualizer to determine the best angle and lenses to use, there is also a built-in camera simulator in the software that shows you the strengths and weaknesses of certain camera placement plans. In general, the cameras work best in pairs to agree on what they are seeing from different angles. This helps triangulate the objects and points they are detecting allowing for a much more precise scan. Cameras should also cover the entire area of the objects to be projected on. This is how you evaluate where and how many cameras need to be used ahead of time and helps choose the correct lens type for each camera. A good rule of thumb is to use a lens just wide enough to fit the entire area of interest.

This system is used so the cameras can make a mesh/model of a 3D object to match the reality or what will be projected on. Is this the case, one can view this mesh through the disguise 3D viewer when programming?
Getting the capture data from the cameras is the first step in this process. Once the capture process is complete, the point cloud data is then compared and aligned to the prebuilt 3D mesh models in the disguise software. Because the point cloud doesn’t have a reference for how it should lineup to the visualizer’s orientation, several points need to be aligned to tie the two types of mesh together. For this process, we use pairs of actual camera captures to pick and place points between the prebuilt 3D mesh and the camera views of the physical object. This process is similar to the aligning process used in QuickCal, but instead of moving a cursor on the actual projected output, we simply select the point on the captured images of the object. When we register the same point on the physical object from two different camera captures, this ties the point cloud mesh created from the cameras to the prebuilt 3D mesh used for creating content, visualizing, and programming. It sounds complex, but it’s actually a straightforward operation.
The final step in this process is called a Mesh Deform, which is used to reconcile any differences between the prebuilt 3D mesh (that was used to create content, previz and program) with the point cloud mesh that the cameras are seeing in the real space. Because there will normally be subtle differences between these objects, the Mesh Deform tool helps make the final projection mapping look perfect on imperfect surfaces.
Can you expand on how you used this technology on the Ariana Grande tour to your advantage?
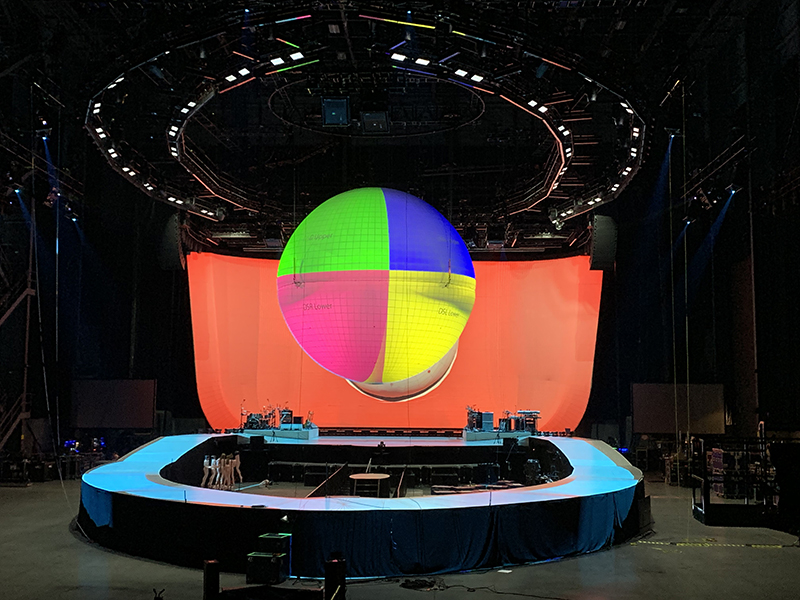
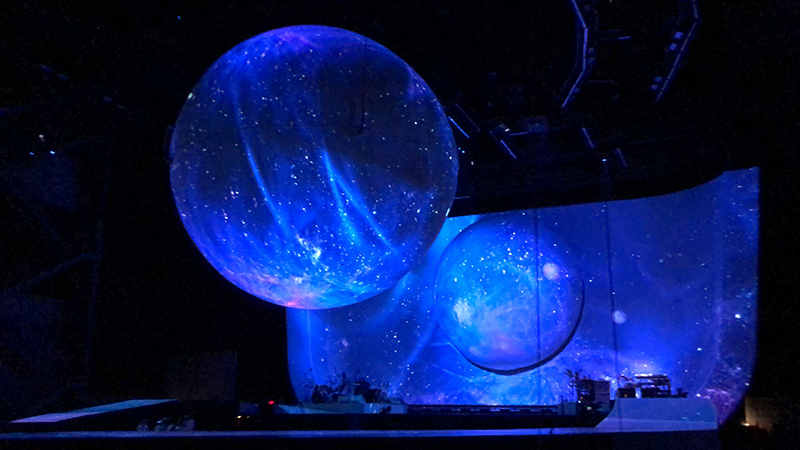
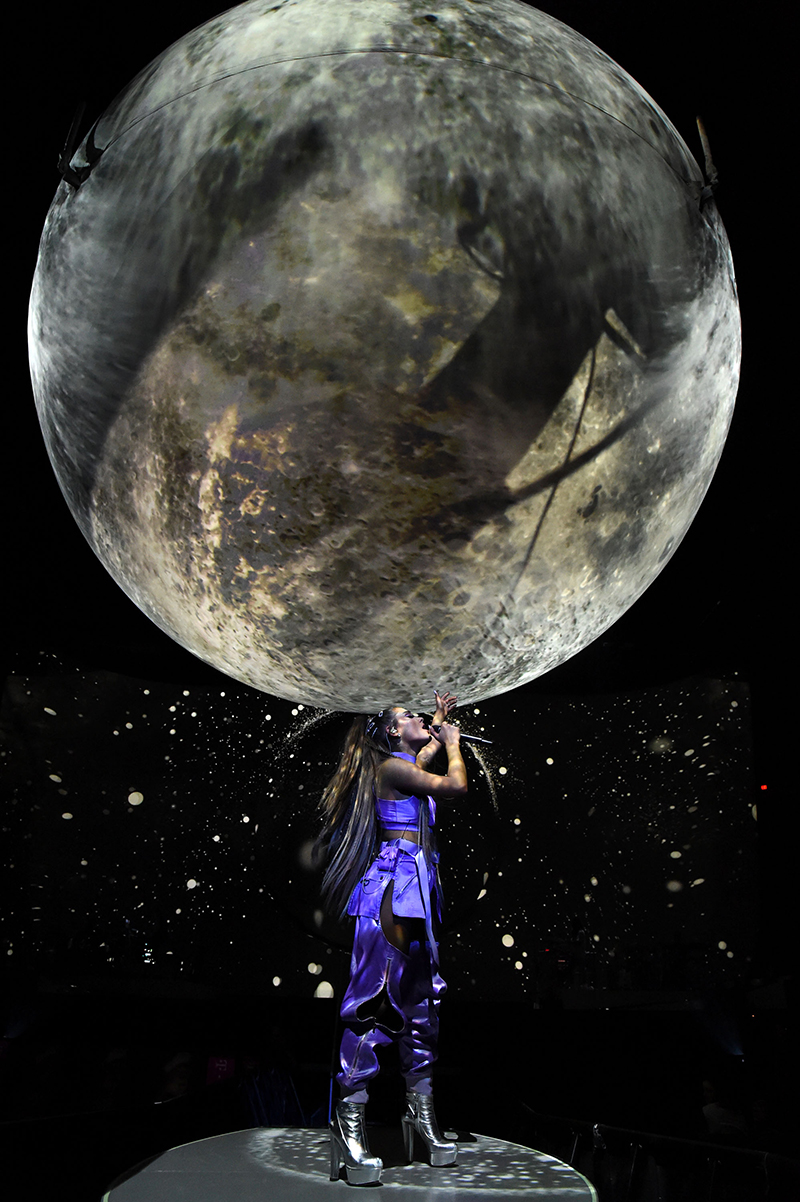
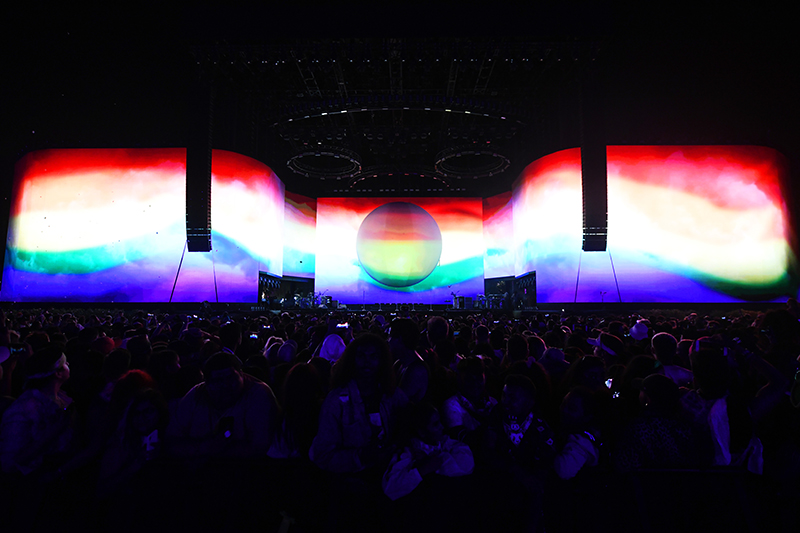
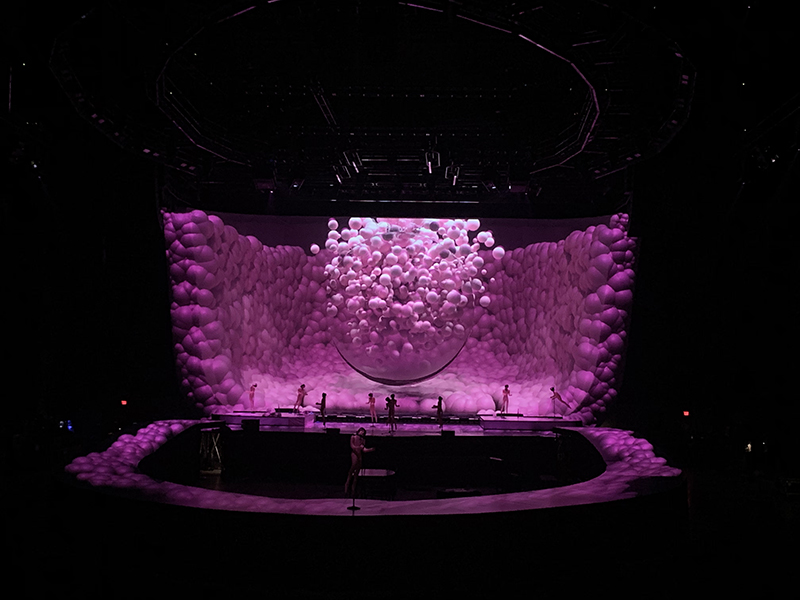
For the Sweetener tour, we were using OmniCal to help us on two major inflatable set pieces: a curved cyc wall with a hemisphere protruding from the center, and a descending sphere. LeRoy Bennett designed a wonderful inflatable world that could be fully projected on and we took that to the extreme. The cyc wall remained inflated to the same level for the entire show, but the sphere actually had to be stored deflated in its home position under the scoreboards and inflated as it deployed. Inflatables are getting much more advanced and so getting a detailed CAD of what they were building helped us develop the initial 3D mesh that we UV mapped (the process of assigning texture positions on a 2D video or image file to the surface of the 3D object). But the very nature of inflatables means there will always be some amount of natural discrepancy between the 3D mesh and reality due to inflation pressure, rigging angles, attachment points to the stage, fabrication, and gravity.
This is where the OmniCal workflow really helped us out. Instead of spending hours each day (that we didn’t have) manually warping each projector to the object in front of us, the cameras automatically created a mesh of the objects as they exist in the current room, imperfections and all. Then the discrepancies between the 3D mesh we had built from drawings and the actual shape of the objects hanging in the room were quickly resolved with the Mesh Deform process.
Who goes up and focuses these cameras?
This first iteration of OmniCal wired hardware utilizes small, machine vision cameras that would normally be right at home installed on a fixed assembly line inspecting parts or scanning QR codes. They are small and fragile and in need of some protection from the rigors of the road. These specific cameras were chosen by disguise because the camera’s characteristics, development package and the three different lenses that could be profiled and loaded into the software so that the disguise software can understand and standardize the captured images coming in. They are powered via the network cable, so no additional power is needed at each camera position.
The cameras needed to ride in their own Pelican cases to be padded and protected from touring life, venue to venue. To get the same focus each day, our initial plan was to attach these cameras to locked-down adjustable mounts, get them perfectly focused, and then document exactly where the clamps were mounted with precise markings on the truss. After the first stop on the tour, we realized this plan wasn’t going to work. The rig was being flown to trim with projectors and cameras together before we’d realize a focus or two had been nudged. With no way to get to the flown camera without causing the whole rig to move, we had to come up with a new plan.
We immediately started brainstorming with the disguise team about possible solutions to this. The real need was for a pan and tilt adjustable camera mount that we could adjust each day from the ground. Upstaging (the lighting vendor on the tour) has been working with Roy for years and is instrumental in supporting his visionary designs. Sometimes this meant building custom fixtures for different projects: MAC 300 LED fixtures for Paul McCartney, MAC 700 mirror head fixtures for Beyoncé, and others. We quickly specified what we needed, and their fab shop went to work. A few dates later they delivered a system of very slick retrofitted Elation LED fixtures with the LED’s taken out and a camera mount in place. They even had a CAT6 pass-through so the camera cables wouldn’t get tangled in the yoke. This allowed us to pull lens focuses to the correct distances on the ground before flying the rig and then position the cameras remotely from the console once they were at trim. From then on, we got perfect camera focus each time, and it really saved us.
Once the event is going on, do you still need the cameras?
Once the system is calibrated, the cameras aren’t needed until the next calibration (on tour, this means the next city). Because the calibration shuts down the media playback and runs an obvious series of test patterns as it captures the data, it really isn’t something that can be done during a show.
There is a very cool function called “Rig Check” which doesn’t create a new mesh, but instead only does the alignment portion of the process by using new camera images and aligning the points to the existing captured mesh. For tours with a very similar setup at each location, this can be a much faster way to recalibrate a rig that doesn’t require a full recapture of the objects.
Did you have any notable issues with this system?
Initially, the biggest issues we faced were networking related. Because all of the cameras were distributed throughout the rig, it wasn’t possible to home-run each CAT6 cable to a single 10G switch. Networking on shows is becoming increasingly complex, and the need for high-level, reliable network design and engineering is almost a necessity for most productions these days. We had several switches up in the rig that all needed to be connected to the ground via fiber, and getting that system rung out initially took some time. disguise also helped us out with some software updates that made the camera network “discovery” process much faster.
Another trick we discovered was that we could use a couple of cameras as “rovers” on cheap tripods and get great coverage from the arena floor to cover the bottom of the sphere and hemisphere, which weren’t visible from the fixed cameras in the rig. This allowed us to use the same cameras to calibrate two different objects and then strike them for the show. So when planning camera placement, keep in mind that cameras don’t need to be connected or in place once the calibration is completed each day, and cameras can be shared over different objects if you do the calibrations separately.
With the tour up and running, we had a few more discoveries to make to get our OmniCal calibration process optimized. One of the biggest surprises the team made after analyzing the data with the disguise development team was that the air handlers in each arena were causing just enough movement in the rigging to cause our cameras and set pieces to not hang perfectly still during the camera captures. This was causing some erratic results from venue to venue and compromising the quality of our calibrations. By turning off all air handling equipment before calibration we were able to get far more repeatable results.
Moving on to tracking people with video content. This has become something we are seeing more and more going forward. Can you explain a little about how the disguise system works for projectors to go through this process. I believe you are combining the disguise server with other technology to do this?
There are several methods to use when tracking moving scenic pieces and people. The method we most often use to track scenery is to capture the Motion Control positional data that comes from the software (like Tait’s Navigator platform). This data is usually transmitted via network to the disguise machines and tied directly to the 3D model of the object in the software. As the object is physically driven from one position to another, the object moves in the disguise visualizer and the media is mapped in real time to the object’s location as it moves. There are many forms this data can take, from a 16-bit Art-Net channel for a single axis (like a screen moving up and down on winches) to a more complex multi-axis motion rig like a robotic arm that moves an object in many planes at once and streaming positional information via PosiStageNet. As long as the data can be transmitted in real time, the behavior of the object can usually be mapped so that the visualizer mimics reality.
Now for set pieces that are not tied into an automation system (like props, human-powered set pieces, or humans themselves), a different method needs to be used to gather the positional data in real time. To capture data for these situations, a vision system like BlackTrax is usually employed. This uses a series of fixed position camera sensors located around the performance space feeding data to a software processor that interprets and streams out positional data from the remote sensors attached to the objects or people being tracked.
The sensors BlackTrax use are a series of small unique-frequency infrared LED “beacons” attached to known points on the person or object (they have individual mini-beacons as well as beltpacks that can power three beacons each). These beacons pulse with a unique frequency so the cameras can detect and differentiate between them and understand their physical orientation. This allows for many people or objects to be tracked in real time at once, and unique characteristics stay with the individuals. When you look at the software of someone being tracked, you see the beacon points floating in space. This data can then be streamed to the media server and tied to the same known points on the costume or object. This way the orientation and location of the target can be replicated in the disguise visualizer and the projections follow.
Does the disguise server now have a built in previz system that can show you the stage and meshes with projection on them moving around and tracking?
Yes, the tracking systems drive the visualizer directly. As long as you can stream real-time or pre-baked data to the server, the visualizer can replicate exactly what would happen with tracked objects in the space.
Camera tracking and AR is something that we are seeing increasingly more in live events, from U2 on their tour to the recent use of this technology the Billboard Music Awards and the VMA’s. Can you expand on how Augmented Reality is being used in the disguise program now?
Extended Reality (XR), Mixed Reality (MR) and Augmented Reality (or AR) are hot-button terms that loosely define situations where the virtual world and real world merge and possibly interact with one another. Virtual Reality headsets completely immerse us in a digital world while Augmented Reality merges a virtual overlay on top of what we are seeing in the real world. Taken a step further, the visual reality a performer is interacting with (like their background) can be created completely in real time and captured “in-camera” while filming the action without the expensive post-processing that green screens require.
The easiest example of AR in our world is the infamous American Football “down-line” overlay that made its debut in 1998. By getting the camera’s real-time position and lens data (and knowing where the cameras were in the stadium), the calculations could be done live to place a yellow line overlay on the screen that would track the same position as the cameras panned and zoomed.
Modern AR is essentially the same idea but instead of placing a 2D line over the screen, a complex 3D model can be placed in the virtual space. By utilizing high-speed tracking technology on each camera, objects and characters that don’t exist in reality can be anchored in the scene as if they were real. These techniques were used during the Madonna performance on this year’s Billboard Music Awards, as well as several elements of the MTV Video Music Awards.
In the film and television world, large-format projection and LED walls, floors, and ceilings are replacing green screens as pre-rendered content and complex game engines drive the graphic environments in real-time. This allows actors to be in the world for the scene instead of shooting out of context against a green screen to later be replaced with the virtual backdrop. This ends up saving productions money and time as they rush to turn out projects faster and faster.
disguise have done several demos of this kind of setup where the position of the camera as it moves on a crane updates the background and floor graphics behind an actor as if in a real environment. The key to this technology is to know the live position of the camera so the perspective of what’s on the background screens is always correct to the camera’s perspective. Several new systems have been developed to capture the position of hand-held cameras that aren’t attached to fixed cranes and tripods which helps to sell the effect more organically.
The pro range of disguise servers boasts of “the power to scale,” while the gx range claims “the power to respond.” What is the difference between these ranges?
The main difference is the graphics cards used in each server. The Pro range uses AMD cards which can drive up to four 4K outputs from the vx 4. When you couple that with the VFC splitter cards, that can supply up to 16x 3G or DVI outputs. These machines are typically chosen for projects with large canvases, multiple outputs and pre-rendered video content.
The gx range excels with power for rendering live effects such as Notch by utilizing Nvidia Quadro graphics cards but with a reduced number of overall outputs (two VFC slots instead of four). Because the graphics cards are optimized for live effects rendering instead of straight video playback, these are the machines often specified for live I-Mag effects and real-time graphics. A few server companies have gone this route by creating separate hardware specifically optimized for Notch and real-time generative effects as improvements in graphics technology have made this a more viable option for our industry.
I rarely see a show using a disguise server that is not equipped with Notch software. Do you utilize this product in your live I-Mag shots of performers much? Have you found any other useful reasons to use Notch other than to manipulate camera feeds?
When Notch was first released, it was often being used for more advanced I-Mag effects than the standard graphics overlays that we’d been seeing from conventional servers. While many productions still use it for this, it is actually a very powerful platform for creating complex 3D content, and increasingly, whole “worlds” of graphical scenes that can be cued to the music much more organically than using pre-rendered videos for the same effects. There are several content houses that specifically use Notch to mock up ideas because it’s faster to build and render out in real-time complex 3D scenes in that environment than baking the same scene down to a flattened video.
The use of the phrase “real-time rendering” is easy to get excited about while production timelines are getting shorter and the demands for visual spectacle get more complex. However, it’s important to realize that “real-time,” in this case, applies only to the time it takes to get the video to the display, it doesn’t apply to the time it takes to set up the scene.
In traditional content development, many hours are put into creating a scene and animating the elements inside the scene with keyframe “cues” (typically on a timeline). Test renders are done to make sure the effect looks correct and edits are made. Finally, the rendering process goes frame-by-frame, creating a stack of high-quality flattened frames that become a playable video. Depending on the complexity, length, resolution, and render capacity of the system or render farm, this can take many hours. The video is then loaded into a media server for playback during the show.
The main difference with the “real-time rendering” approach is that the final step of creating the visuals is done on the graphics card as it’s outputting the results at full speed. Instead of creating a flattened video ahead of time, the graphics card is creating the visuals live to the display. The best way to think about this is like a video game (incidentally, that’s the market that is big enough to keep developing this graphics technology at breakneck speed). When you play a video game, input from your controller is affecting the scene in real-time. The rendering of that scene is happening on the graphics card while you are playing the game. Now if, instead of a game, imagine you’re playing along to a song in a more simplified visual world. The snare hits are one button, and a specific musical flourish is another, etc. As you play along to the music, the scene reacts organically, even if the music isn’t the same each time. We already have this controller in our production workflow: it’s the lighting desk. By triggering this “visual game” with production protocols like DMX and MIDI, the graphics become more adaptable to the live environment instead of being locked to a pre-rendered video. Now, if the song changes tempo or the performer hits a different mark on the stage, the graphics can be designed to adjust accordingly.
The software platforms at the core of most video games are called Game Engines. Many of the big ones were developed for specific types of games and then licensed to other companies to create similar games with different stories and artwork. Since much of the main programming had already been done, these engines became popular development platforms. Notch is one of the first commercial engines that bridges this idea of “real-time rendering” with the live production world and built an infrastructure that enabled media servers to host and output these “visual games” directly to display surfaces during productions. This is certainly the direction media production is headed for live entertainment.
For more information on disguise, visit www.disguise.one.
